

OYE! In the midst of yet another blast from mother nature. For those of you in warmer areas, could you share the love?! Please?! I've had about enough of 'ol man winter! Since all I see is a winter wonderland (it is quite pretty), I guess it translated to my card today :) I originally saw a hand drawn snowman face somewhere in blog land and kept it tucked in my memory, but all I could remember was her name was Kim too - isn't she snow cute?!
* Get your MOJO going - jumpstart your kreation with a challenge, it gets those juices flowin! I started off with the current MOJO176 sketch challenge. Cut my Baja Breeze cardbase to a 5-1/4 square
* A soft winter sky. A piece of Paper Vellum was inked with Craft White Serene Snowflakes and dusted with some Iridescent Ice Embossing Powder. Heat it with your Heat Tool for that perfect glimmer
* Strategy! How do you place vellum without seeing how it is adhered? In this case, a Glue Dot is strategically placed in the corners behind a snowflake. Sneeky ;)
* SNOW much fun! Tear your Whisper White paper, Smooch it with Vanilla Shimmer Mist and dazzle the drift with Dazzling Diamonds. Instant snow :)
* Now get punchy! A 1-3/8 and 1-3/4 Circle Punch kreate the snowlady. The Round Tab Punch, altered a tad makes for a cute little hat. And to finsh off her ensemble with a Blushing Bride scarf, I used the Word Window and Photo Corner Punch. Paper Snips were used to kreate some fringe on the ends of the scarf. Last but not least a Small Heart made with the new Glimmer Paper.
* Decorated her hat and scarf with a Daffodil Delight Rosette. Don't worry, you didn't miss something! Take your very vanilla Rosettes from the Occasions Mini and alter it to whatever color SU Marker you'd like. How versatile!
* Bedazzle - Added Basic Pearls to the Rosettes and her body and more Dazzling Diamonds to accent her rosy cheeks, chin, and body (TIP: I use a very little Crystal Effects to adhere my diamonds)
* Make it 3D - add a few Dimensionals for that bit of depth
* The sentiment Enjoy, from the Occasions Mini You're a Gem set falls among the snowflakes. To make it pop alitte, since it kinda blends in, I placed a Basic Rhinestone in the 'o'
* A final touch was some Chuncky Essentials glitter at the base of Rosey(as my daughter named her) and in the center of a few snowflakes.
I hope you Enjoyed ;)
NOW, I know you've been waiting so lets get to the WINNER of my blog candy! But first,thank you for all the wonderful comments on my KISSaturday card.
Drumroll please....... Random.org picked JEN
Jen said...
Love love love the card. It is so perfect!
Jen, please email me your address within the next 72 hrs so I can get your goodies to you. If I do not hear from Jen, I will pick another winner!
Thanks for stopping in! I hope you liked my MOJO interpretation(see other challenge inspiration below!) and I hope it inspires you to get your fingers inky! I love it when you share, so let me know what ya think,K?
Any questions, I am always just a click away!
REMINDER:
SALE A BRATION is in full swing!!!!! NOW thru March 31st
You can purchase all products online with me or email me with your orders.
Happy Kreating
Other Challenges:
Anything Goes: The Paper Players
Bling it Up: The Rubber Cafe
Punch It: Pile It On
Winter Something: Stamp Something
ETA: Mary let me know the Kim I was speaking about was Kim Score. Thank Mary! And apparently the face I recalled was stamped, not hand drawn like mine. How cool would that be if SU had some face images to go with our punch art??? CUTE! Hint Hint SU
Wednesday, February 2, 2011
SNOW cute and a WINNER


Tuesday, November 9, 2010
Holiday Lineup

I decided to play with The Paper Players this week with their oh so fun Snowman theme challenge #23. And I thought there was another challenge out there All That Glitters, but maybe I just dreamt that one?! But anywho, I decided to combine it with my snowmen, dream or no dream! I was lucky enough to have just borrowed the Holiday Lineup set from my SIL (thanks Lizzie) and decided to put it to use with those cute snowmen. If you follow my blog, you know that I enjoy line images to color, so I couldn't wait to play with this set. Having so much fun with the snowmen, I decided to use each image, so make sure to scroll down to see :)
* Standard Whisper White cardbase
* Snowmen, from Holiday Lineup, inked in Basic Gray and stamped onto Whisper White.
* Colored in my images with various SU Markers TIP: Kreate darker hues of the same color by coloring over the same area multiple times. If you like matchy matchy, no need to stress over finding coordinating colors - use the same color, just make it darker!!
* Lightly penciled in a frame around the image. Followed my line with Crystal Effects and added White Chucky Glitter to 'frame' my cute little snowmen.
* A little more sparkle was added to the hat pom pom with Dazzling Diamonds.
* Finished it off with a Baja Breeze sentiment from Many Merry Messages.
And here are Santas Elves and Reindeer using the same design
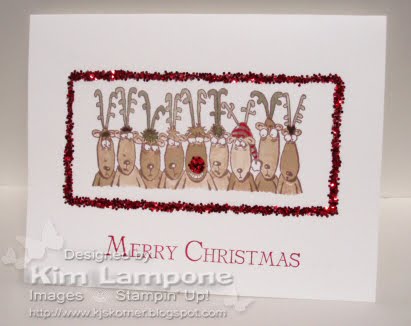
Simple colored in images with lots of white space and a 'frame' with pizazz ;)
Thanks so much for stopping by for a little dose of me! So what did you think of my Holiday Lineup? I'd love to know what ya think, so please leave me a comment and let me know, K? Any questions, I am always just a click away!
You can purchase all products online with me or email me with your orders.
Happy Kreating
Challenges:
The Paper Players - Snowman theme
Simon Says Challenge - All White except image
Craft Your Days Away - All White
Flourishes Timeless Tuesday - Glitter
Thursday, October 15, 2009
On Comet, On Cupid, On DASHER!

Time to play at the Pals Paper Arts. Today is a sketch challenge, PPA12. As soon as I saw that circle, I knew I wanted to use the very popular single stamp, Dasher. He is just dashing, isn't he!! And for $8.95, what a deal!!! Tip: Make sure to check out the 'under $10' page in the Idea Book and Catalog (pg 208). Great for little gifts!
I had a piece of Shimmery White paper that had been run through my Big Shot with the Petals a Plenty Impressions folder, from the Holiday Mini, just waiting to be used. I thought it would be so pretty to add a little extra shimmer to this already lustery paper. A little shimmer paint, Dasher and a sketch...and away we go
* Standard Whisper White card base. Top corners rounded with a 3/16" Corner Rounder Punch
* 4 x 5-1/4 Shimmer White piece run through the Big Shot with the Petals-a-Plenty Impressions folder - then cut in half.
* Inked up a Dauber with Champagne Mist Shimmer Paint and daubbed it over my embossed flowers.
* Using my Circle Scissors Plus, I cut out my perfect 3" Circle. Tip: If you like drawing or cutting circles and layering circles, this is a must have tool!! So easy, I just love it!!
* Inked up dauber again with Champagne Mist and applied it directly to Dasher and stamped him onto my circle - Gorgeous!! (unfortunately you can't see the shimmer) A little more ink onto the dauber and applied to the edges of the circle.
* Using the already gorgeous Organza ribbon, I applied Champagne Mist with a dauber directly onto my ribbon. Shimmery and so pretty and a perfect match to my card! Tied a separate bow and with a glue dot placed it directly in the center.
This card is so much prettier in person and I'm sorry that I couldn't capture it with the photo, you're just gonna have to trust me :)
Happy Stamping and don't forget to check out all the promotions. Any questions, email me
*Clearance Rack(ongoing) - Click my Shop Online button to view retired surplus inventory
*Deal of the Week (now- Oct 31) - Available with Online Orders
*Sweet Rewards Hostess Promo (now - Nov 30)
*Join My Team - with a My Digital Studio Starter Kit deal!! (now - March 31, 2010)
Shop ALL product orders online with me.
Supplies:
Stamps: Dasher(116816)
Paper: Shimmery White(101910), Whisper White(100730)
Ink: Champagne Mist Shimmer Paint (116806)
Accessories: Big Shot(113439), Petals-a-Plenty Impressions Folder(116824), Circle Scissors Plus(112530), Corner Rounder (109047) , White Organza Ribbon(114319), Daubers(102892)

Sunday, September 6, 2009
Serene Snowflakes
 I kreated this card for my recent Holiday Mini class bash and it also complies with Stamp Simply #103 challenge to 'merely stamp your sentiment over your image'. This card had the wow factor in my class as it was so easy to kreate using a very cool technique called VersaMark Resist. (click on card to enlarge) Ready for the steps and supplies...
* Started with Glossy White cardstock
* Inked up my Serene Snowflakes in VersaMark and randomly stamped them onto the Glossy Cardstock
* Inked up my Brayer in Bashful Blue Classic ink and rolled it over my Glossy Cardstock until it was completely covered and 'blended'. Tip: I rolled my brayer both vertically and horizontally over the card to get full blended coverage - continue to ink up brayer and apply to glossy paper to achieve desired hue of color.
VOILA' my beautiful Serene Snowflakes resist the ink and kreate a beautiful card in minutes!
* My sentiment from All Holidays was inked with Ruby Red Craft ink and guess what... for those of you who follow me regularly know that I love my Ice :), I sprinkled Iridescent Ice Embossing Powder and with my Heat Tool, heated to set my sparkle. Tip: When heating Glossy Cardstock it tends to warp slightly, a little extra SNAIL adhesive to the back and layering onto an additional matte will do the trick!
* Glossy Cardstock image matted with Whisper White and layered onto my Brocade Blue card base.
* The delicate Organza Ribbon was the perfect touch for my Serene Snowflakes. Accented with a Jumbo White Grommet and faux knot adhered in the middle with a glue dot... I LOVE the simplicity of this card. Definitely falls into my 'under 15' minutes category! Hope you like it. Leave me a comment below to let me know, love it when you do!!
Shop ALL product orders online with me.

Supplies:
Stamps: Serene Snowflakes (Holiday Mini 115438), All Holidays (114916)
Paper: Glossy Cardstock (102599), Whisper White (100730), Brocade Blue (101166)
Ink: VersaMark( , Bashful Blue(105209)
Accessories: Brayer (102395), Organza Ribbon(114319), Jumbo Grommets(114348)
Iridescent Ice Embossing Powder(101930), Heat Tool (100005)

Thursday, September 3, 2009
Simple Snowman

When I first saw this set in the mini, I knew I wanted to isolate my 'man', leaving off the thank you sentiment on his belly and kreate my snowman in the snow. So with todays PPA color challenge, Brocade Blue, Ruby Red, Crushed Curry, I decided to dress him up and sit him in the snow.
* Using my Basic Black SU marker to outline him, I stamped him onto Whisper White
* Inked up his hat and scarf again and stamped on Ruby Red and Crushed Curry. Snipped out the layers of his hat and scarf and pieced the 'outfit' together. Tedious task but worth the look, I punched out my little Crushed Curry dots with my handheld punch and adhered them with my 2-way glue pen
* Tore a piece of Whisper White and scraped the edges with VersaMark and gave the snow some life with Iridescent Ice
* Kreated a 'mask' of this snowman by stamping and snipping him out. Layered my mask over my card and then with my dauber and Brocade Blue ink, I kreated by sky background
* Using a small circle punch and piercer, I kreated my Ruby Red buttons.
* Pastel chalks give a subtle pink glow to the cheeks and an Only Orange Marker makes for the perfect carrot nose
* Finally took my 'scene' and layered onto a Ruby Red card base
Isn't he a darling snowman? I love it :)
Shop ALL product orders online with me.
Supplies:
Stamps: Simple Seasonal Thanks (111548)
Paper: Whisper White, Ruby Red, Crushed Curry
Ink: Brocade Blue, Basic Black, VersaMark
Accessories: Iridescent Ice Embossing Powder, Dauber, 1/16" Circle Punch, Pastel Chalks




 Posts
Posts


